It's all in the layers...
Week 7 of our Photoshop class had us working with layer effects and text. The assignment was to create a CD cover. As my PC had just died, I didn't have Livewire photos at my fingertips - just the photos from our trip up to Sonoma over Memorial Day. I decided to create a CD cover for a digital portfolio.
 I wanted to create a warm image with a romantic feel. I created the cover from three photographs: a garden statue, roses over a fence post, and a peacock. An immediate challenge faced by the selection of these photos was the lighting - the statue is in the shade, the flowers are in the bright afternoon sun. As the lesson for the week had focused on layer effects the range of lighting should be easy to address.
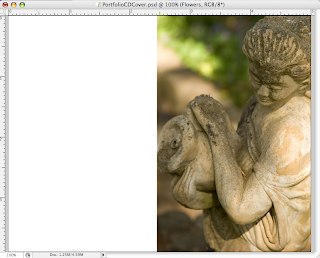
I started with the image of the statue and increased the canvas size to create the white space on the left.
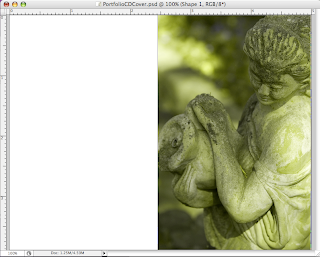 To create the romantic feel I wanted, I created a new layer and added a vector mask to the right side of the photo. I set the layer style to Hue and then played with the color of the vector mask until I found one I liked - a nice soft green.
The result of the Hue was to remove contrast from the image. I created a duplicate layer from the background with just the water bearer. I removed the background so that just the statue remained. I created a clipping mask of the Hue with the water bearer statue and set the layer style to Darker Color and the Opacity to 90%. Notice how some of the brown from the original statue photo now shows on her face and the pitcher. When I tried this without the clipping mask of the statue, the brown from the duplicated statue is applied throughout the image and not just at the face, shoulder and pitcher.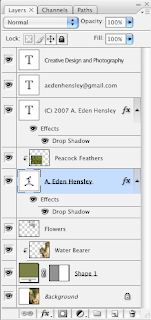
Next I cropped the photo of the flowers and fence post to just the upper left corner of the flowers - making sure that the height of the cropped flowers was the same as the water bearer. I then copied that layer into the image. I made the water bearer layer active, selected all removed the background so that just the statue was selected, then made the flower layer active and removed the part of the flowers that overlapped with the statue. I wanted the light from the background to come through the flowers so I set the layer style to Screen and the Opacity to 80%.
Finally I added the text layers. I wanted it to appear that the statue was pouring the text so I applied a warp effect. To give the text depth and movement, I applied a drop shadow and then a clipping mask of the peacock feathers.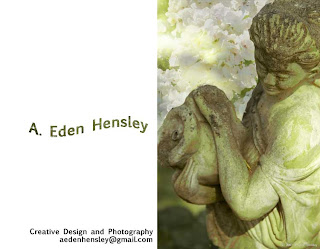
 I wanted to create a warm image with a romantic feel. I created the cover from three photographs: a garden statue, roses over a fence post, and a peacock. An immediate challenge faced by the selection of these photos was the lighting - the statue is in the shade, the flowers are in the bright afternoon sun. As the lesson for the week had focused on layer effects the range of lighting should be easy to address.
I started with the image of the statue and increased the canvas size to create the white space on the left.
 To create the romantic feel I wanted, I created a new layer and added a vector mask to the right side of the photo. I set the layer style to Hue and then played with the color of the vector mask until I found one I liked - a nice soft green.
The result of the Hue was to remove contrast from the image. I created a duplicate layer from the background with just the water bearer. I removed the background so that just the statue remained. I created a clipping mask of the Hue with the water bearer statue and set the layer style to Darker Color and the Opacity to 90%. Notice how some of the brown from the original statue photo now shows on her face and the pitcher. When I tried this without the clipping mask of the statue, the brown from the duplicated statue is applied throughout the image and not just at the face, shoulder and pitcher.

Next I cropped the photo of the flowers and fence post to just the upper left corner of the flowers - making sure that the height of the cropped flowers was the same as the water bearer. I then copied that layer into the image. I made the water bearer layer active, selected all removed the background so that just the statue was selected, then made the flower layer active and removed the part of the flowers that overlapped with the statue. I wanted the light from the background to come through the flowers so I set the layer style to Screen and the Opacity to 80%.
Finally I added the text layers. I wanted it to appear that the statue was pouring the text so I applied a warp effect. To give the text depth and movement, I applied a drop shadow and then a clipping mask of the peacock feathers.


